Creating and running prompts
Let's create our very first Unstract prompt in Prompt Studio to fetch the name of the credit card issuer.
- Click on the
+ Promptbutton to add a new prompt cell
Let's understand the different components that make up a prompt cell:
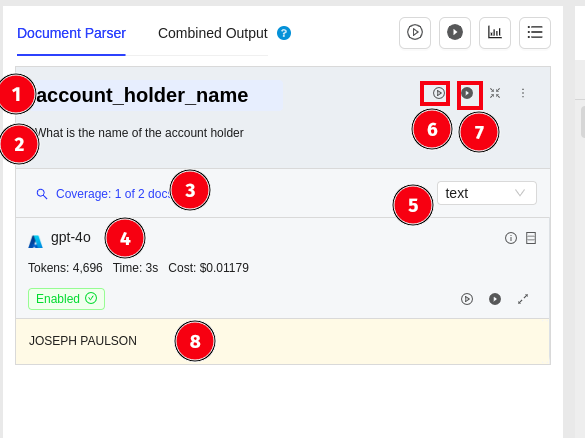
- Field Name: This is the field name of the prompt. This will be the field name used in the JSON output. You'll need to make sure this is JSON key syntax compatible.
- Field Prompt: Prompt used to extract the field.
- Coverage Info: We have 3 documents loaded into this Prompt Studio project. Coverage Info shows you the number of documents for which this prompt created any output. In this screenshot, we see that our prompt returned some output for all 3 documents, making our coverage 100%. Coverage only checks for
null. You'll need to manually check if the values themselves make sense. - LLM Profile Settings: Shows the currently selected LLM Profile for this prompt. You can use the LLM Profile Switcher (highlighted by
9) to switch profiles and then re-run the prompt. - Output type selector: You can switch between types of output you need. Prompt Studio takes care of adding the prompts required to generate that type of output behind the scenes automatically for you. You can choose between text, data, number, JSON object, etc. When a new prompt is created, the default is always set to
Text. - Run all LLM for current document: Runs the prompt only for current selected document and all added LLM profiles
- Run all LLMs for all documents: Runs the prompts for all document and for all added LLM profiles
- LLM Response: This is the area which shows you the response from the LLM.
The Run Prompt button is highlighted in red. As you enter the field name and field prompt, they're auto-saved. You can then click on the Run button to run the prompt.
For this example prompt, here's what we enter:
- Prompt Field:
account_holder_name - Field Prompt:
What is the name of the account holder - Click on the Run button
Understanding Prompt Coverage
While you can switch documents via the Documents Manager and examine the LLM output for each of them, it's way easier to see what output we got for each document for a particular prompt using Coverage Info.
In the above prompt cell, we see that we have coverage for all 3 documents, meaning the LLM selected responded with some output for all three documents for the given prompt.
Clicking on the Coverage link brings up the Coverage Panel, which shows the output against the document's file name.
