Enterprise SSO — Microsoft Azure AD
This guide walks through configuring Azure AD (Microsoft Entra ID) as an identity provider for Unstract using OpenID Connect (OIDC). Unstract uses Auth0 as an identity broker, which connects to your Azure AD tenant for enterprise SSO.
Throughout this document and in the screenshots, highlights are used to indicate items that need to be shared between parties:
- Green highlight — Items the Customer shares with Unstract (e.g., Domain, Client ID, Client Secret, Directory Groups)
- Yellow highlight — Items Unstract shares with Customer (e.g., Redirect URI)
- Red box — Key value to locate in the Azure portal screenshot
1. Unstract Configuration to be Used
The Unstract team will share a redirect URI specific to your deployment type. Use this when registering the application in Azure AD.
| Deployment Type | Redirect URL |
|---|---|
| Enterprise Cloud | https://auth.unstract.com/login/callback |
| Enterprise On-prem | https://zipstack-on-prem.us.auth0.com/login/callback |
2. Steps to be Performed by the Customer
2.1 Create App Registration in Azure AD
REF: Microsoft — Register an application
- Go to Entra ID > App registrations and select New registration (refer Section 3.1).
- Enter a meaningful Name for your app. Users can see this name, and it can be changed at any time.
- Under Supported account types, specify who can use the application. We recommend Accounts in this organizational directory only for most applications.
- Fill in the redirect URI field with the redirect URI shared by the Unstract team (refer Section 1). Select the platform as Web.
- Click Register to submit the App registration.
- Once registered, share Domain, Client ID, Client Secret with the Unstract team:
- Domain (refer Section 3.2)
- Client ID (refer Section 3.3)
- Client Secret (refer Section 3.4)
2.2 Configure User Directory Groups
Create a user directory group in Azure AD for each Unstract role in each deployed environment. These groups are later mapped to Unstract roles by the Ops team.
If your organization has multiple Unstract environments provisioned, user directory groups need to be configured for each environment.
The following Unstract roles require a corresponding directory group:
unstract_adminunstract_userunstract_supervisorunstract_reviewer
For example, for a given environment you would create groups such as unstract_admin_<env>, unstract_user_<env>, unstract_supervisor_<env>, and unstract_reviewer_<env> — and similarly for all other provisioned environments.
Once the groups are created, share the group names with the Ops team so they can complete the role mapping as described in the Unstract Roles Guide.
If a user's directory group is not mapped to an Unstract role, that user will be forbidden from accessing the application.
2.3 Configuration to be Shared with Unstract
| Config | Where to Obtain |
|---|---|
| Domain | See 2.1 step 6 / Section 3.2 |
| Client ID | See 2.1 step 6 / Section 3.3 |
| Client Secret | See 2.1 step 6 / Section 3.4 |
| User directory groups | See 2.2 |
3. Screenshots for Reference
3.1 Register Application
Navigate to Entra ID > App registrations and select New registration to open the registration form shown below.

3.2 Find the AD Domain
Navigate to the Overview page of your Azure AD tenant. The Primary domain field (highlighted with a red box in the screenshot) contains the domain value to share with the Unstract team.

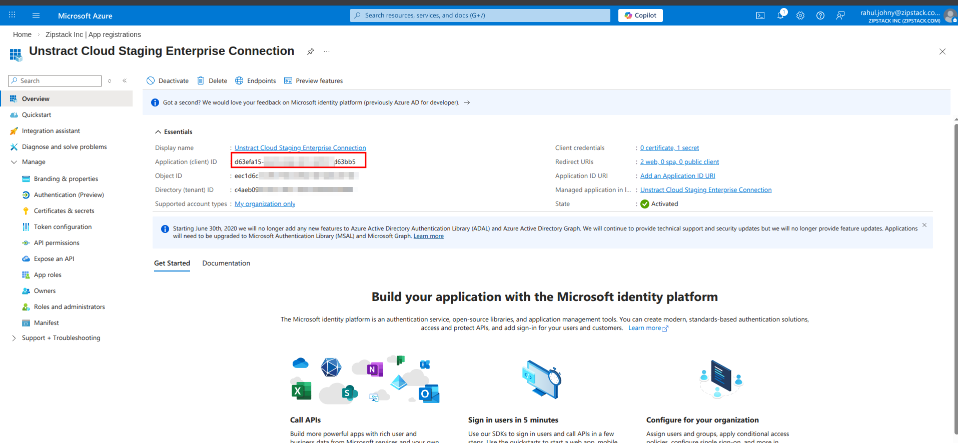
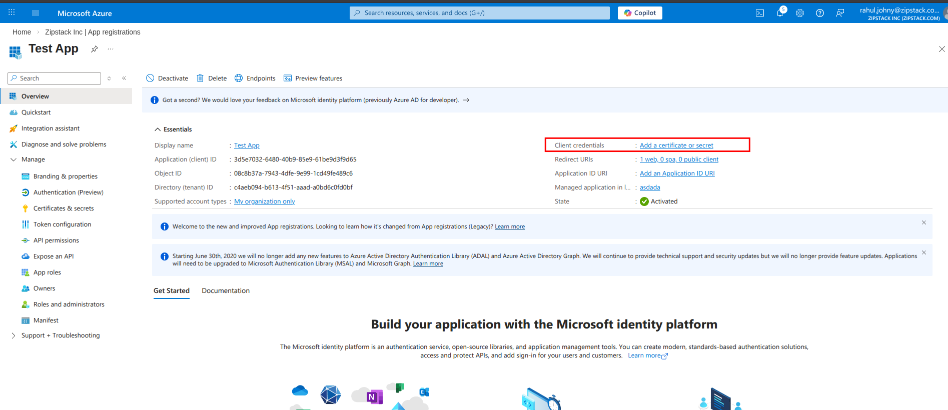
3.3 Find the Client ID
Go to Entra ID > App registrations and select your registered application. On the Overview page, locate the Application (client) ID (highlighted with a red box in the screenshot). Share this value with the Unstract team.
3.4 Create a Client Secret
Go to Entra ID > App registrations and select your registered application. Navigate to Certificates & secrets (highlighted with a red box in the screenshot) in the left sidebar.
Under Client secrets, click + New client secret. Add a description and set an expiration period. Click Add and copy the secret Value (not the Secret ID). Share this value with the Unstract team.
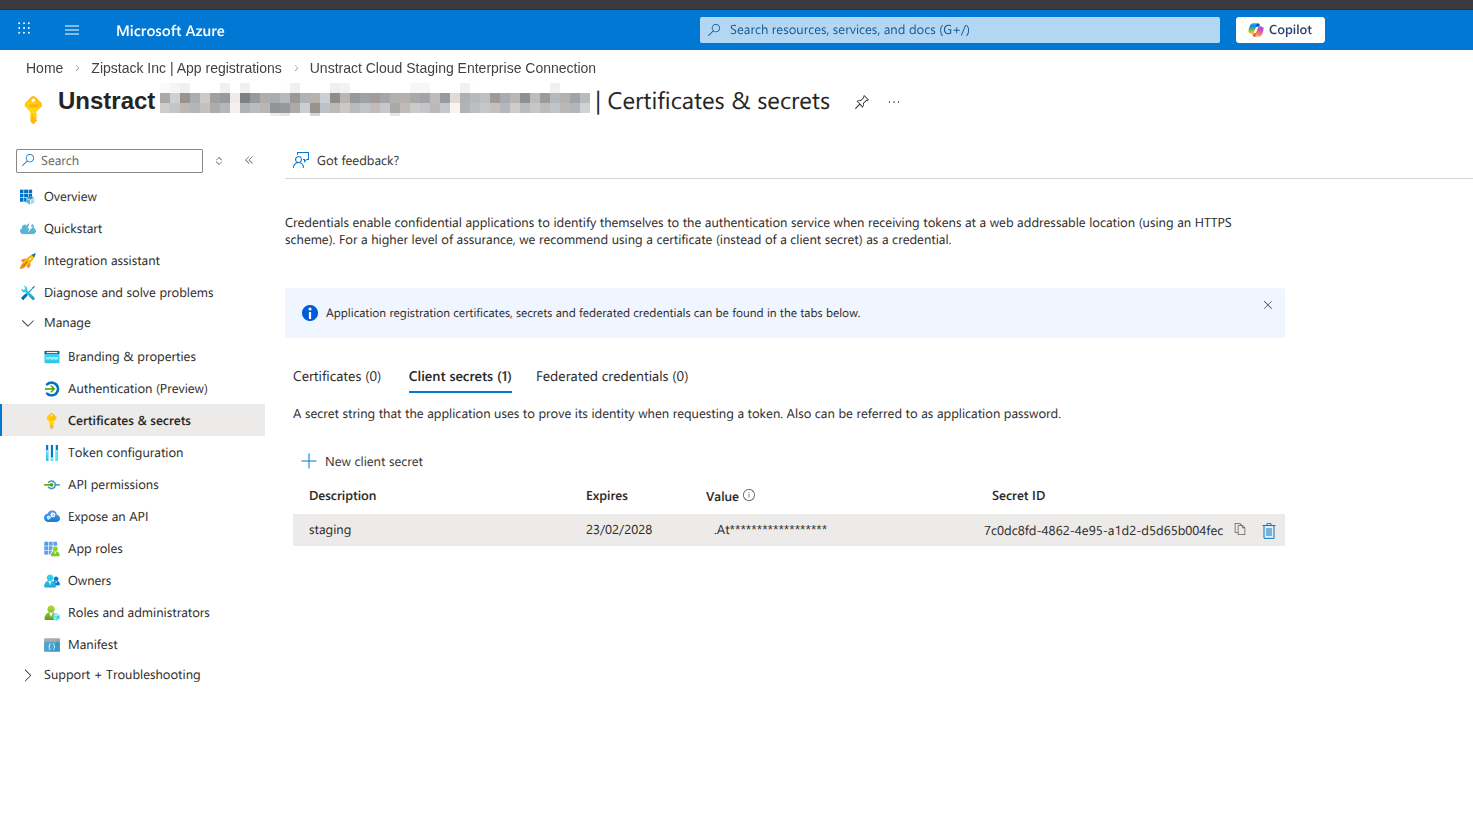
The client secret value is only shown once at creation time. Make sure to copy and securely store it before navigating away.
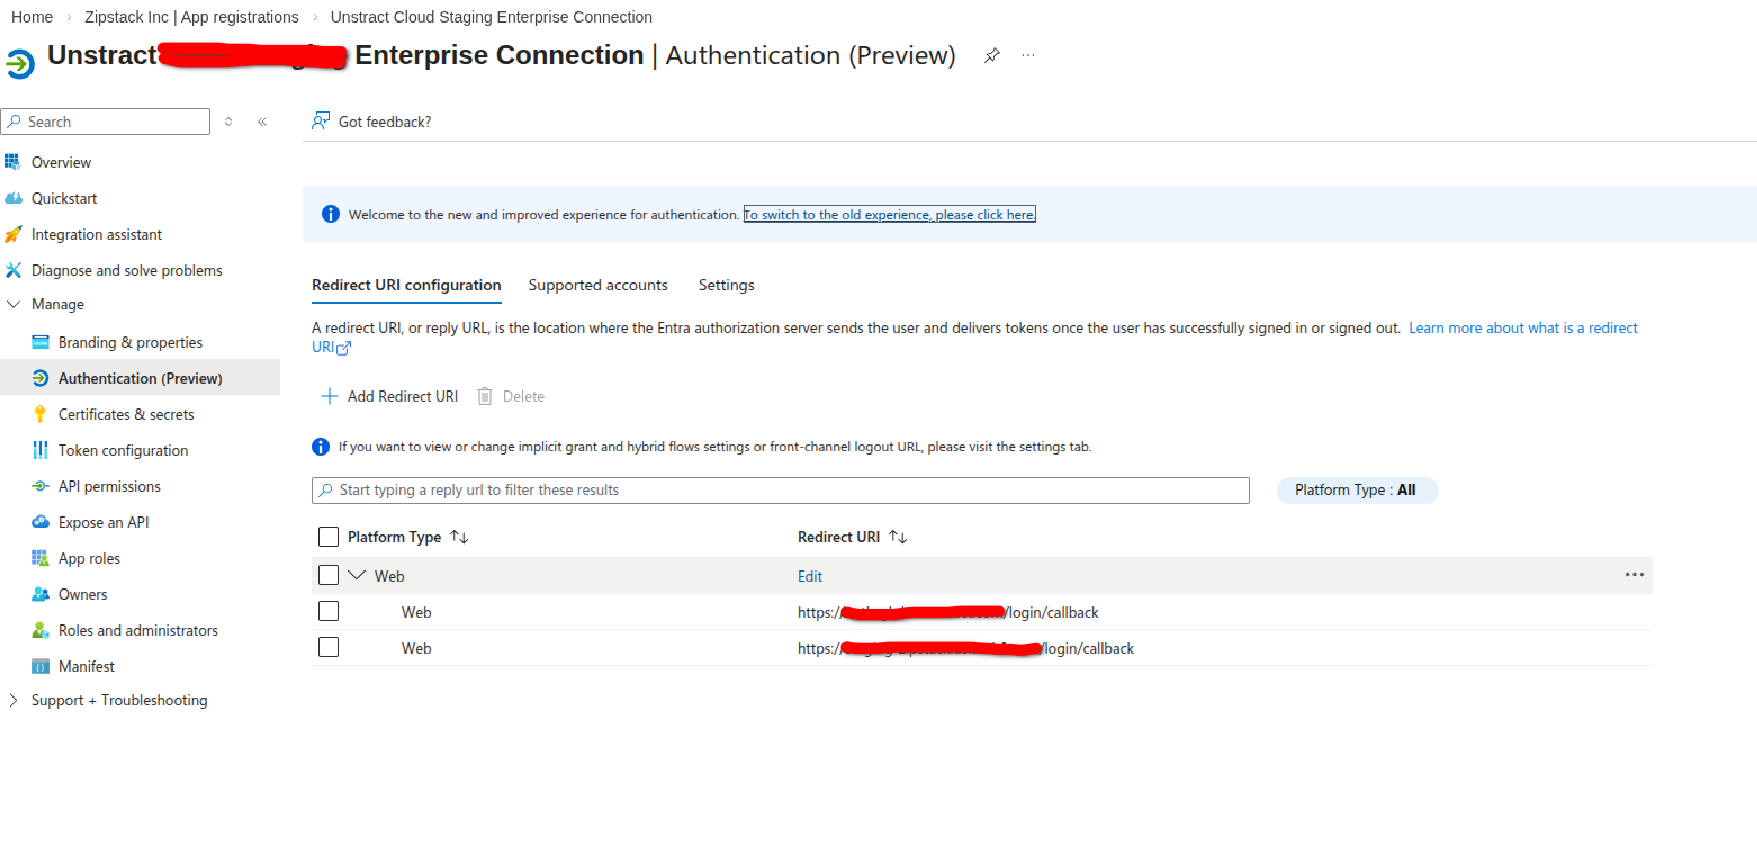
3.5 Configure the Redirect URI
Go to Entra ID > App registrations and select your registered application. Navigate to Authentication (Preview) in the left sidebar. Under Redirect URI configuration, click Add Redirect URI. Select platform type Web and enter the redirect URI shared by the Unstract team.
4. Auth Architecture
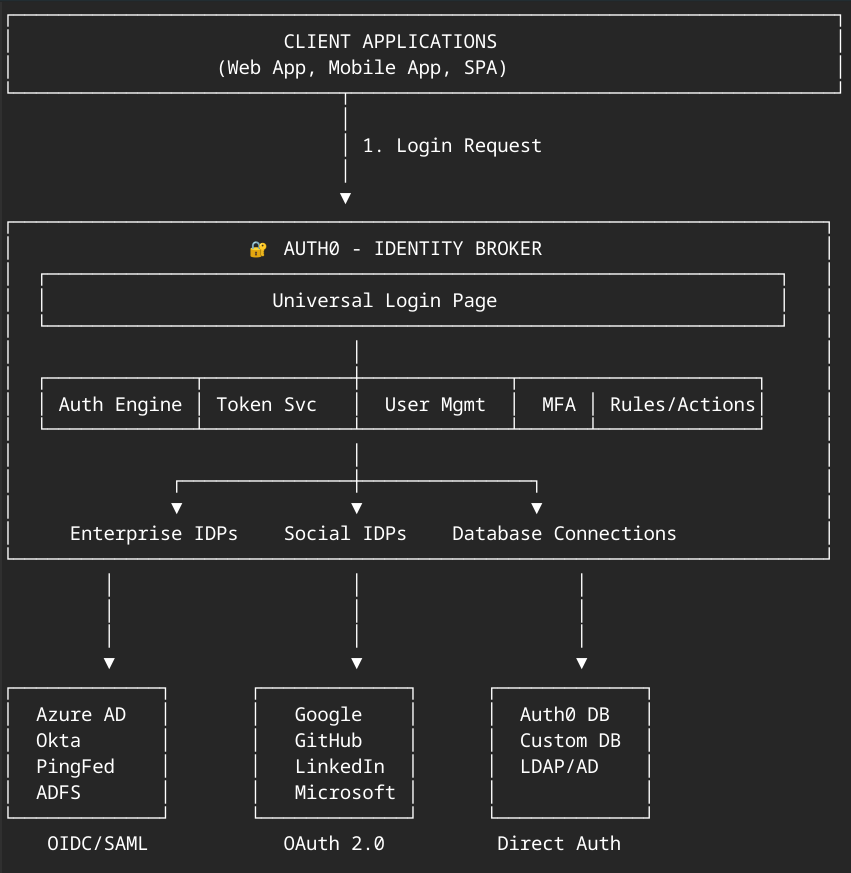
4.1 Auth0 as Identity Broker
Unstract uses Auth0 as an identity broker that sits between the application and your identity provider. Auth0 handles:
- Universal Login Page — Centralized authentication experience
- Auth Engine & Token Service — Token issuance and validation
- User Management — User profile and session management
- MFA — Multi-factor authentication support
- Rules/Actions — Custom authentication logic
Auth0 connects to multiple identity provider types:
| Connection Type | Protocol | Supported Providers |
|---|---|---|
| Enterprise IDPs | OIDC/SAML | Azure AD, Okta, PingFed, ADFS |
| Social IDPs | OAuth 2.0 | Google, GitHub, LinkedIn, Microsoft |
| Database Connections | Direct Auth | Auth0 DB, Custom DB, LDAP/AD |
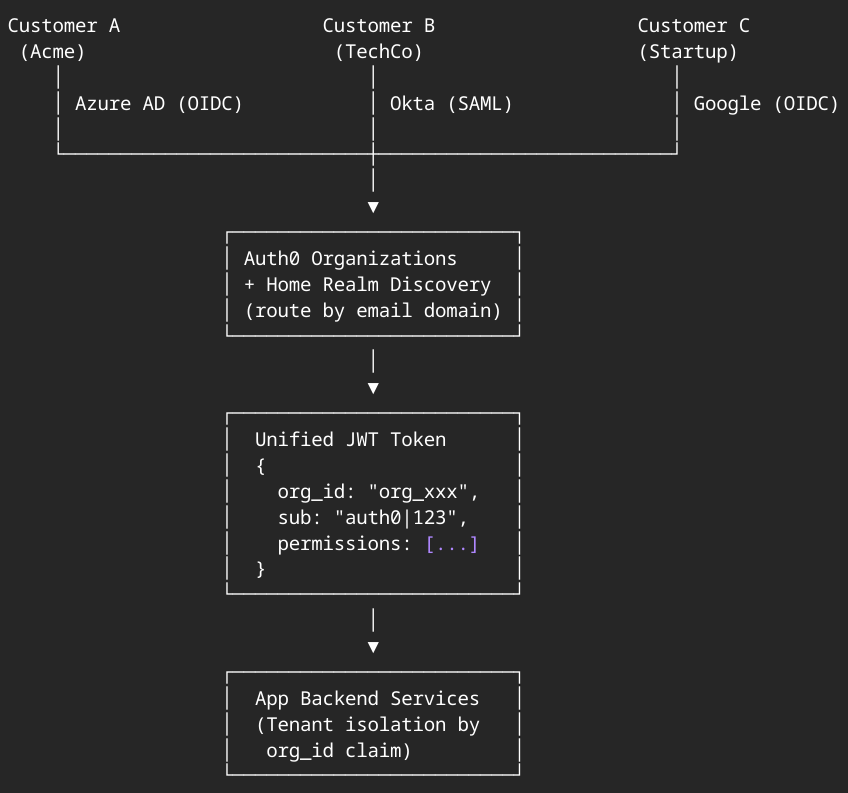
4.2 Enterprise Connection Flow
In a multi-tenant setup, Auth0 Organizations with Home Realm Discovery routes users to their correct identity provider based on their email domain. The flow produces a unified JWT token containing:
{
  "org_id": "org_xxx",
  "sub": "auth0|123",
  "permissions": [...]
}
The application backend services use the org_id claim for tenant isolation.