On-Prem Deployment Guide
This guide provides comprehensive instructions for deploying Unstract in an on-premises environment. Unstract is deployed inside a Kubernetes cluster, packaged as a Helm chart.
LLMWhisperer is a required dependency for Unstract and must be deployed before deploying Unstract. Refer to the LLMWhisperer On-Prem Deployment Guide for its deployment details.
Before proceeding, ensure all infrastructure has been provisioned per the Infrastructure Requirements page. In particular, the RabbitMQ Cluster Operator — Unstract's required message broker dependency — must already be installed; it ships with the LLMWhisperer prerequisite setup.
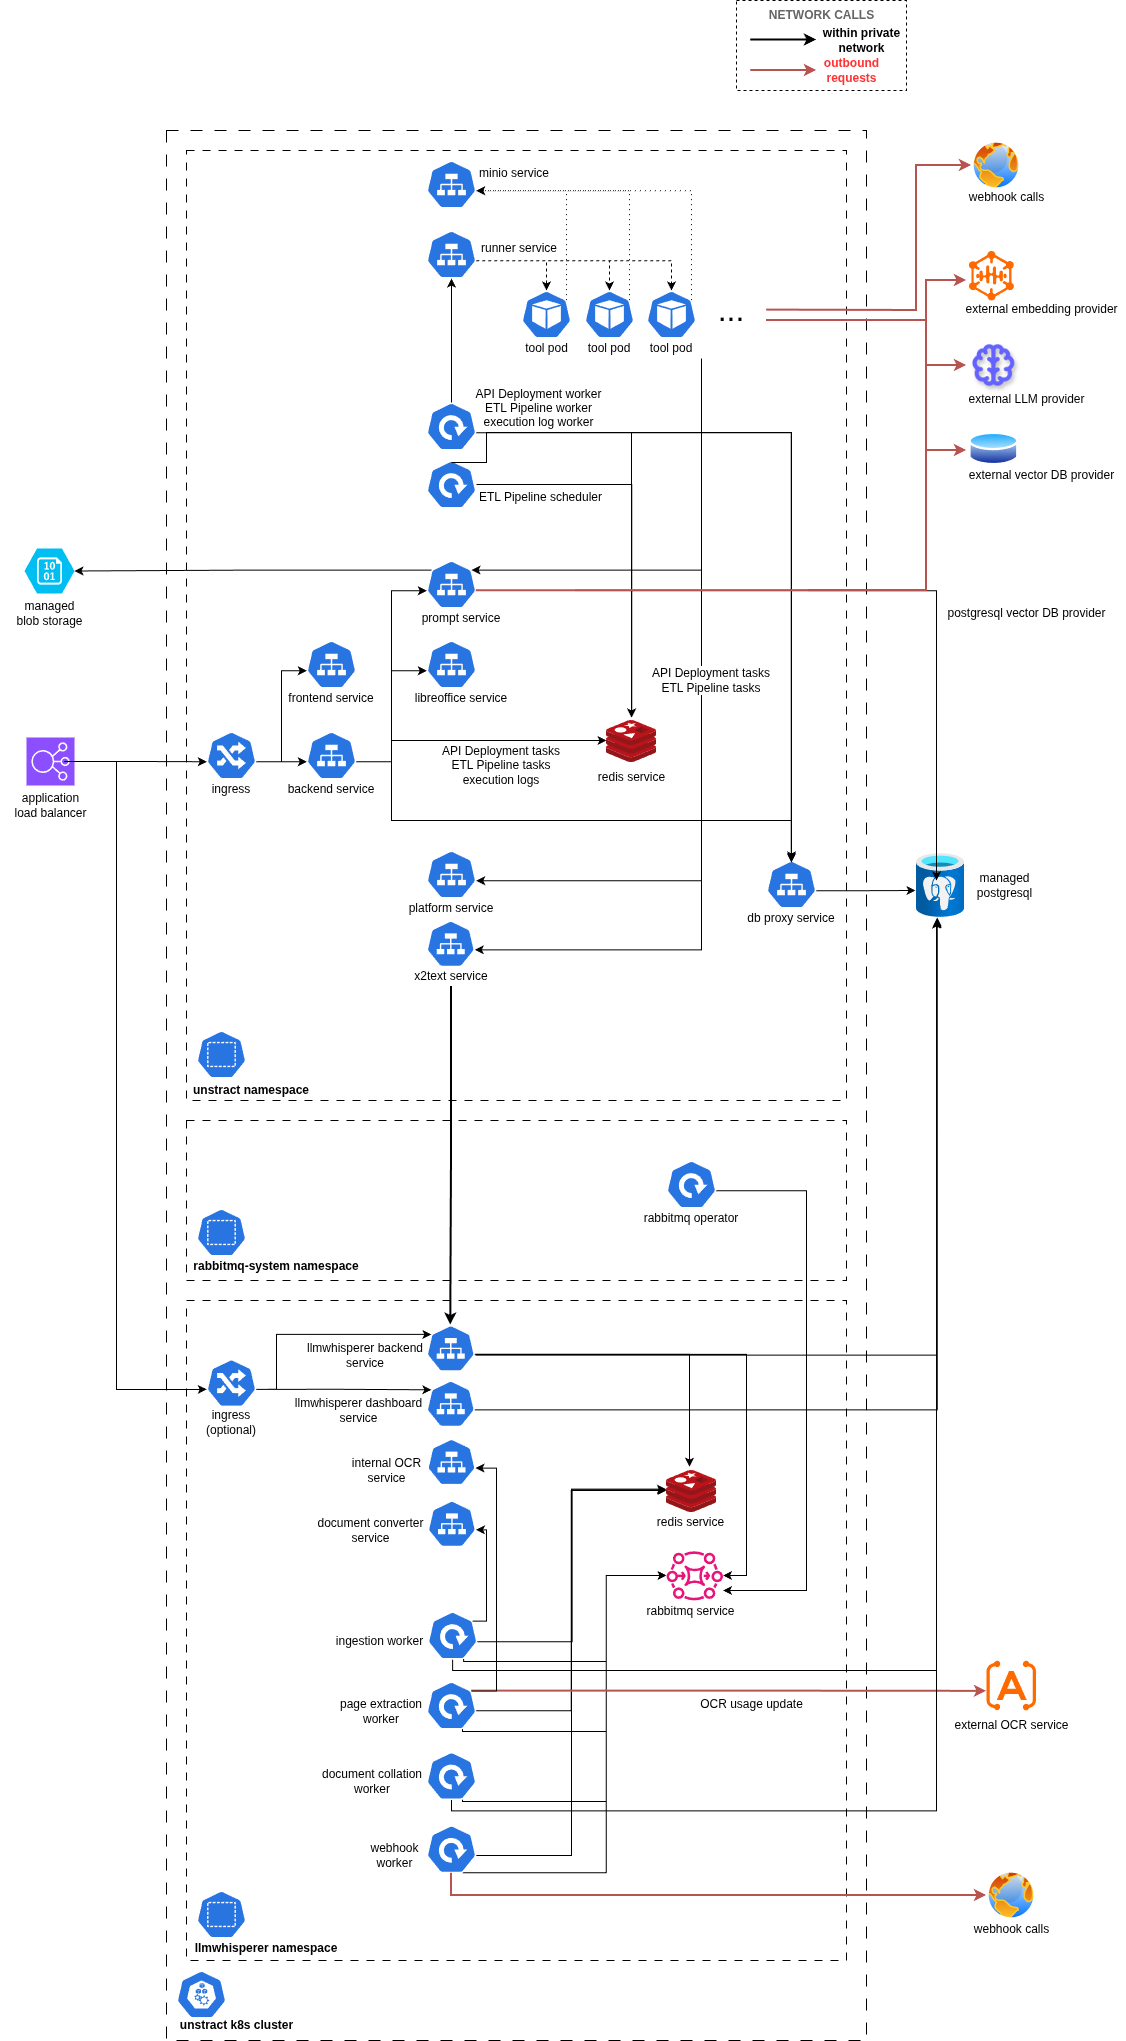
For an overview of all services and their interactions, see Appendix a: Service Diagram.
1. Configuration
Files Provided by Unstract Team
The following files will be provided by the Unstract team:
| File | Description |
|---|---|
artifact-key.json | GCP service account key for Helm chart registry login and container image pull |
sample.on-prem.values.yaml | Sample Helm chart values (all configuration, including sensitive credentials) |
Required Configuration Values
These values must be provided by the customer or the Unstract team to deploy Unstract:
| Variable | Description | Source |
|---|---|---|
Domain name (ingress.hostLookup.unstract) | Domain to be used for the on-prem installation | Customer |
Ingress class (ingress.className) | Ingress controller class (e.g. nginx, alb) | Customer |
Base URL (ingress.host.baseUrl) | Full https://<domain name> URL (must match the Domain name above); platform URLs are derived from it | Customer |
PostgreSQL (ORIGINAL_DB_HOST, DB_USER, DB_PASSWORD, DB_NAME, ENCODED_DB_PASSWORD) | External database host and credentials; ENCODED_DB_PASSWORD is DB_PASSWORD percent-encoded (for connection strings), not a separate credential | Customer |
RabbitMQ (CELERY_BROKER_USER, CELERY_BROKER_PASS) | Message broker credentials | Customer |
PERMANENT_REMOTE_STORAGE | Remote blob/object storage configuration | Customer (see Remote Storage Config) |
Remote file paths (REMOTE_SIMPLE_PROMPT_STUDIO_FILE_PATH, REMOTE_PROMPT_STUDIO_FILE_PATH, REMOTE_LOOKUP_FILE_PATH) | Object-storage bucket paths for prompt-studio and lookup data | Customer |
TOKEN_CLIENT_ID, TOKEN_CLIENT_SECRET | M2M token client ID and secret | Unstract Team |
ZIPSTACK_ID_CLIENT_ID, ZIPSTACK_ID_CLIENT_SECRET | OAuth application client ID and secret | Unstract Team |
ZIPSTACK_ID_DOMAIN | Authentication platform (Auth0) domain — provided by the Unstract Team (constant for all on-prem customers) | Unstract Team |
ZIPSTACK_ID_ENV | Auth0 organization metadata (JSON) for this environment — supplied by the Unstract Team; paste as-is | Unstract Team |
ENCRYPTION_KEY | Encryption key for sensitive data — must be backed up securely | Self-generated |
The four TOKEN_CLIENT_* / ZIPSTACK_ID_* rows above apply to the default authentication provider, which is brokered through Auth0. On-prem deployments can instead authenticate directly against Microsoft Entra ID, in which case those rows do not apply — there is no Auth0 application — and the following are required instead:
| Variable | Description | Source |
|---|---|---|
AUTH_PROVIDER (backend.configMap) | Authentication provider: auth0 (default) or azure_ad | Customer |
authAzureAd.enabled (global.sharedConfigs) | Set to true together with AUTH_PROVIDER: "azure_ad"; the chart rejects one without the other | Customer |
AZURE_AD_TENANT_ID | Directory (tenant) ID of the Entra app registration | Customer |
AZURE_AD_CLIENT_ID | Application (client) ID of the Entra app registration | Customer |
AZURE_AD_CLIENT_SECRET | Client secret value of the Entra app registration | Customer |
ENABLE_ENTERPRISE_SSO_SETUP (backend.configMap) | Must be the quoted string "True". The setup Job it gates is what seeds the domain and role-mapping records — without it, every Entra user is refused at login regardless of how their groups are mapped | Customer |
ORG_NAME (backend.configMap) | Organization display name, shown in the organization picker. Read only when the organization is first created | Customer |
ROLE_MAPPING (backend.configMap) | Entra group Object IDs mapped to Unstract roles, as a JSON array string | Customer |
ingress.hostLookup.unstract must also be set and match the host in global.host.baseUrl, since it supplies the domain the role mappings attach to. The app registration additionally needs the User.Read.All and GroupMember.Read.All Microsoft Graph Application permissions with admin consent granted. See the Microsoft Azure AD (direct) guide for the full setup, the optional AZURE_AD_* tuning keys, and the group-to-role mapping it requires.
The ENCRYPTION_KEY is critical for decrypting sensitive credentials. Do not rotate, delete, or lose this key — doing so will render existing encrypted data inaccessible.
Configuring Helm Chart Values
As of v0.170.0, the separate sample.on-prem.secret.yaml was removed and its
contents were consolidated into the single sample.on-prem.values.yaml. If you are
upgrading from an earlier release, migrate your on-prem.secret.yaml values into
on-prem.values.yaml and drop the secret file. This is part of a larger breaking
global.sharedConfigs secret/configmap restructure — if you maintain a custom
secret overlay, see the v0.170.0
On-Prem Release Notes before
upgrading (each shared config still accepts an existingSecret override).
- Rename
sample.on-prem.values.yaml→on-prem.values.yaml on-prem.values.yamlcontains all configuration, including sensitive credentials- Search for everything marked as
# <REQUIRED>and substitute with appropriate values
2. Installation (One-Time)
Step 1: Create Namespace
kubectl create ns unstract
Step 2: Authenticate Helm Registry
cat artifact-key.json | helm registry login -u _json_key --password-stdin https://us-central1-docker.pkg.dev
Step 3: Create Image Pull Secret
kubectl create secret docker-registry gcr-artifact-secret \
  --namespace unstract \
  --docker-server=us-central1-docker.pkg.dev \
  --docker-username=_json_key \
  --docker-password="$(cat artifact-key.json)"
Step 4: Install Helm Chart
The release name must always be unstract-platform and should not be changed. Internal service communication between platform components depends on this name, and using a different release name will cause the deployment to fail.
helm install unstract-platform oci://us-central1-docker.pkg.dev/pandoras-tamer/charts/unstract-platform \
  --version <version> \
  -f /path/to/on-prem.values.yaml \
  -n unstract
Replace <version> with the target release version (see On-Prem Release Notes).
3. Post-Deployment Validation
Health Checks
| Service | Port | Network Type | Endpoint |
|---|---|---|---|
unstract-backend | 8000 | HTTP | /health |
kubectl get pods -n unstract
All pods should be in Running state with zero restarts.
Restrict Redis network access so the bundled Redis is reachable only from within the Unstract namespace. It is a values change with no downtime, and applies to both standard and HA deployments.
To run against a managed Redis (Memorystore, ElastiCache, Azure Cache) or your own server instead of the bundled one, see Using an External or Managed Redis.
Admin Login
The first admin receives an invitation via email (from the Unstract team), which can be used to log into the Unstract platform. Once logged in, the admin can invite other team members who need access.
Adapter Configuration
Adapters must be configured before using the platform. Go to Settings → Adapters:
-
LLM → Provide your model endpoints (OpenAI, Claude, etc.). See supported LLMs for configuration details.
-
Embedding → Bring your own embedding model. See supported embeddings for configuration details.
-
VectorDB → Either bring your own or use the Unstract PostgreSQL instance with pgvector. See supported Vector DBs. To set up pgvector, see Appendix c.
-
Text Extractor → Unstract is usually bundled with LLMWhisperer, which is the recommended extractor. This requires that LLMWhisperer be deployed first.
-
Configure the LLMWhisperer backend URL:
http://whisperer-backend.<NAMESPACE>.svc.cluster.local:3006/Replace
<NAMESPACE>with the namespace where LLMWhisperer is deployed. Alternatively, use the load balancer URL if one has been created for the LLMWhisperer backend. -
For
Unstract Key, this has no effect in on-prem deployments. Enter any value (e.g.,DUMMY_KEY).
-
Backups
Securely back up:
ENCRYPTION_KEYfromon-prem.values.yaml(critical for data recovery)- PostgreSQL data
- Object storage bucket/container data
4. High Availability (HA) Deployment (Optional)
For production environments requiring automatic failover and multi-replica redundancy, Unstract supports HA mode for Redis (Sentinel), RabbitMQ (quorum queues), and MinIO (Operator-managed). When the Kubernetes cluster spans multiple Availability Zones, the deployment will automatically be multi-AZ. See the HA Deployment Guide.
5. Upgrading
Do not reuse an older on-prem.values.yaml as-is. Each release may add, rename,
or remove Helm values, so before every upgrade diff your existing
on-prem.values.yaml against the sample.on-prem.values.yaml embedded in the
target release version and bring over any added, renamed, or changed keys —
keeping your own configured values. See
Download Configuration Files
to obtain the sample for a specific version. If upgrading from a release that still
used on-prem.secret.yaml (before v0.170.0), also fold those secret values in —
see the note under Configuring Helm Chart Values.
- Configure
on-prem.values.yamlas required for the target release version - Run the upgrade command:
helm upgrade unstract-platform oci://us-central1-docker.pkg.dev/pandoras-tamer/charts/unstract-platform \
  --version <new-version> \
  -f /path/to/on-prem.values.yaml \
  -n unstract
Upgrading across the PostgreSQL queue change
Upgrading from v0.179.0 or earlier to v0.180.0 or later moves task processing from RabbitMQ to PostgreSQL, and the path you take decides whether queued work survives. See Migrating to the PostgreSQL Queue.
6. Customer Teams Responsibilities (Execution Plan)
| Step | Team | Task | Description |
|---|---|---|---|
| 1 | Infra Team | Provision VPC, subnets, security groups | As per internal standards |
| 2 | Infra Team | Provision PostgreSQL instance | See Infrastructure Requirements |
| 3 | Infra Team | Provision object storage (S3 / Blob / GCS) | See Remote Storage Config |
| 4 | Infra Team | Provision Kubernetes cluster (EKS / AKS / GKE) | See Infrastructure Requirements |
| 5 | Network Team | Configure DNS, SSL certificate | For network ingress |
| 6 | Platform Team | Apply ingress Kubernetes resource | Confirm access with kubectl cluster-info |
| 7 | Platform Team | Get credentials from Unstract team | artifact-key.json, API keys, etc |
| 8 | DevOps Team | Populate Helm values YAML files | Fill all # <REQUIRED> placeholders |
| 9 | DevOps Team | Deploy Unstract Helm chart | See Section 2 |
| 10 | DevOps Team | Validate deployments | Check pods health, API availability |
| 11 | Admin Team | Complete onboarding via email invite (when Enterprise SSO is not enabled) | Access Unstract dashboard |
| 12 | Application Team | Configure adapters and setup flows | Refer documentation and ensure end-to-end sanity |
Appendix
a. Service Diagram
The diagram below shows the services and their interactions within an Unstract on-prem deployment.
b. Useful Commands
Kubernetes:
kubectl get pod -n <namespace>
kubectl describe pod <pod-name> -n <namespace>
kubectl logs <pod-name> -n <namespace>
Helm:
helm list -n <namespace>
helm show values oci://us-central1-docker.pkg.dev/pandoras-tamer/charts/unstract-platform --version <version>
helm rollback unstract-platform <revision-number> -n <namespace>
helm uninstall unstract-platform -n <namespace>
c. Setup PostgreSQL as Vector DB (Optional)
Prerequisite (Azure Only)
- Enable extensions in server parameters.
- Go to your PostgreSQL instance in Azure portal > Settings > Server Parameters > Search for
azure.extensions> SelectVECTORextension. This allows the extension in the instance.
Configure pgvector
-- Create a database within the instance for vector use case
CREATE DATABASE vector_db;
-- Select the created DB
\c vector_db;

-- OPTIONAL: Check the `vector` extension is available.
-- For AWS
SHOW rds.extensions;
-- For Azure
SHOW azure.extensions;

-- Enable vector extension
CREATE EXTENSION vector;

-- Verify if it got enabled. The output will show `vector` if enabled.
\dx

-- or
SELECT *
FROM pg_extension;
d. Data Migration (Docker to Kubernetes)
If Unstract has already been running on a Docker-based system and is now being moved to Kubernetes, a data migration is required. Before the Docker-based system is brought down, follow the steps below to migrate existing data to the remote storage configured above.
1. Create the migration compose file
Save one of the following as data-migration.yaml based on your storage provider.
Azure:
version: '3.8'
services:
  azure-sync:
    image: mcr.microsoft.com/azure-cli:latest
    container_name: azure-sync
    volumes:
      - unstract-cloud-platform_prompt_studio_data:/app/prompt_studio_data
    environment:
      - AZURE_STORAGE_CONTAINER=${AZURE_STORAGE_CONTAINER}
      - AZURE_STORAGE_CONNECTION_STRING=${AZURE_STORAGE_CONNECTION_STRING}
    entrypoint: ["/bin/sh", "-c"]
    command: >
      "az storage blob sync --connection-string '$AZURE_STORAGE_CONNECTION_STRING' -c $AZURE_STORAGE_CONTAINER -s /app/prompt_studio_data -d prompt-studio-data"

volumes:
  unstract-cloud-platform_prompt_studio_data:
    external: true
AWS:
version: '3.8'
services:
  aws-sync:
    image: amazon/aws-cli:latest
    container_name: aws-sync
    volumes:
      - unstract-cloud-platform_prompt_studio_data:/app/prompt_studio_data
    environment:
      - AWS_S3_BUCKET=${AWS_S3_BUCKET}
      - AWS_ACCESS_KEY_ID=${AWS_ACCESS_KEY_ID}
      - AWS_SECRET_ACCESS_KEY=${AWS_SECRET_ACCESS_KEY}
      - AWS_ENDPOINT_URL=${AWS_ENDPOINT_URL}
    entrypoint: ["/bin/sh", "-c"]
    command: >
      "aws --endpoint-url=$AWS_ENDPOINT_URL s3 sync /app/prompt_studio_data s3://$AWS_S3_BUCKET/prompt-studio-data"

volumes:
  unstract-cloud-platform_prompt_studio_data:
    external: true
2. Run the migration
Prepare a .env file with the environment variables listed in the compose file, then run:
docker compose --env-file .env -f data-migration.yaml up
Or pass them inline:
AWS_S3_BUCKET=<> AWS_ACCESS_KEY_ID=<> AWS_SECRET_ACCESS_KEY=<> AWS_ENDPOINT_URL=<> docker compose -f data-migration.yaml up