Configuring a Look-Up
This feature is available in Unstract Cloud Edition and Unstract On-Premise Edition.
This page walks through the lifecycle of a Look-Up: creating it, uploading reference files, linking it to a prompt, writing the template, testing, publishing, and what to expect once it's running in production.
Two ways to create a Look-Up
You can start a new Look-Up from either of two places, depending on whether you already know which prompt it'll be attached to.
From the Look-Ups tab in the project title bar
Inside a Prompt Studio project, the title bar has a Look-Ups tab alongside the usual project tabs. This is the central definition page where every Look-Up in the organisation is listed and managed.
Click Look-Ups in the title bar, then Create Look-Up, and give it a descriptive name (for example, Vendor canonicalization or HSN code lookup). Unstract creates the Look-Up with an empty draft version, pre-seeded with your default LLM and text-extraction adapters. You'll land on the Look-Up detail page, where you can upload reference files, write the template, and run tests.
This is the right entry point when you're designing a reusable Look-Up that you plan to wire up to several prompts (or even several projects) afterwards.
From a prompt card's kebab menu
Inside the Document Parser, every prompt card has a kebab menu (⋮). Picking Configure Look-Up from there opens the Look-Up Drawer, which is essentially the same editor as the detail page but in an overlay scoped to that prompt.
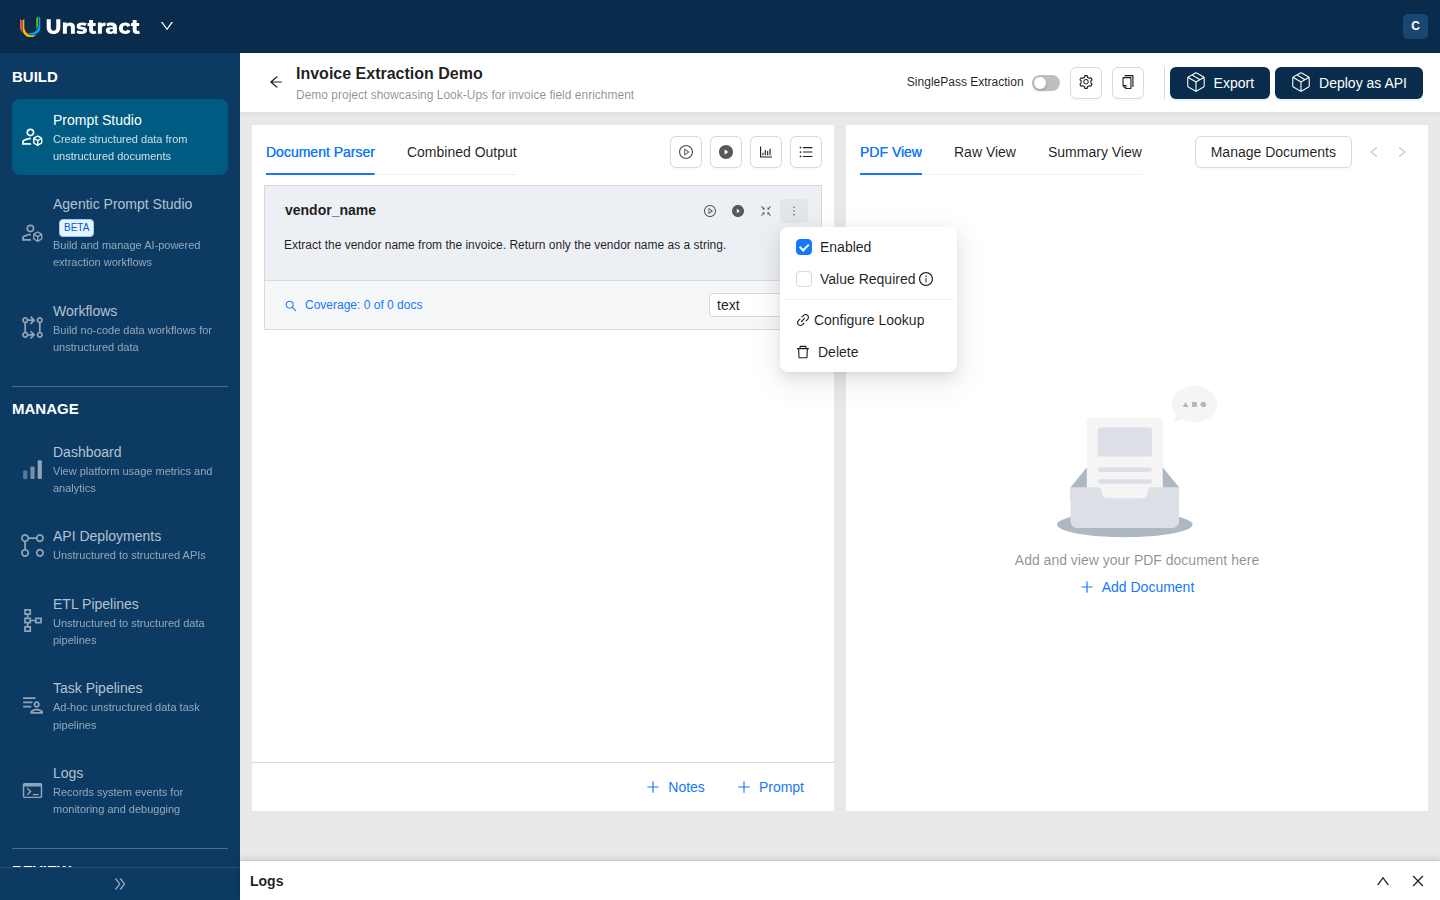
From the drawer you can either pick an existing Look-Up to link, or create a brand-new one inline. Either way, the link to the current prompt is set up at the same time.
This is the right entry point when you're working on a specific prompt and realise it needs enrichment.
Both paths produce the same kind of Look-Up. They just differ in whether the link to a specific prompt is created at the same time.
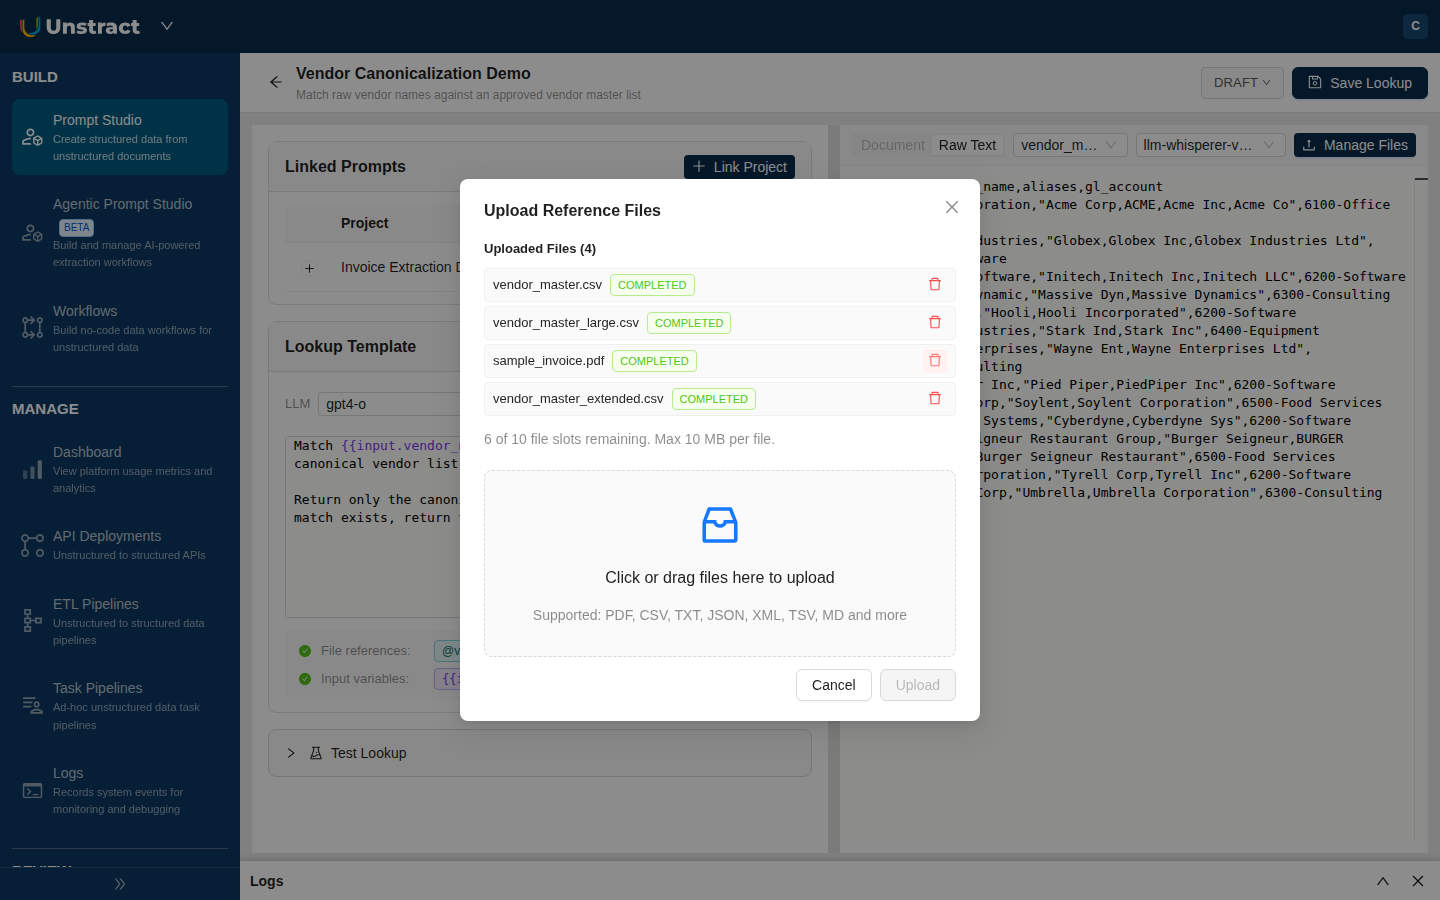
1. Upload reference files (optional)
If your Look-Up needs to consult external data (a vendor master, a chart of accounts, a code list, a policy document), upload it from the reference files panel on the right. Drag and drop, or click Upload.
- Each file is extracted once on upload, using your project's configured text extractor. The status moves through
PENDINGtoCOMPLETED(orERRORif extraction fails). You'll see the extracted-text preview alongside the raw file. - You can upload up to 10 reference files per Look-Up, each up to 10 MB.
- If you change the text-extraction adapter's configuration later, the file is automatically re-extracted the next time the Look-Up is read or run, so you don't need to re-upload anything.
2. Link the Look-Up to a prompt
It's worth doing this before writing the template. Once a Look-Up is linked, the template editor's autocomplete picks up the available {{input.X}} variables from your linked prompts, which makes writing the template a lot easier.
If you started from the prompt card kebab menu, you're already linked. If you started from the Look-Ups tab, link it now:
- Open the Prompt Studio project's Document Parser.
- On the prompt card whose extracted value you want to enrich, click the kebab menu (
⋮) and pick Configure Look-Up. - The Look-Up Drawer opens. From the header selector, pick the Look-Up you just created.
- Click Link Look-Up.
The prompt card now shows a Look-Up indicator confirming the link is active.
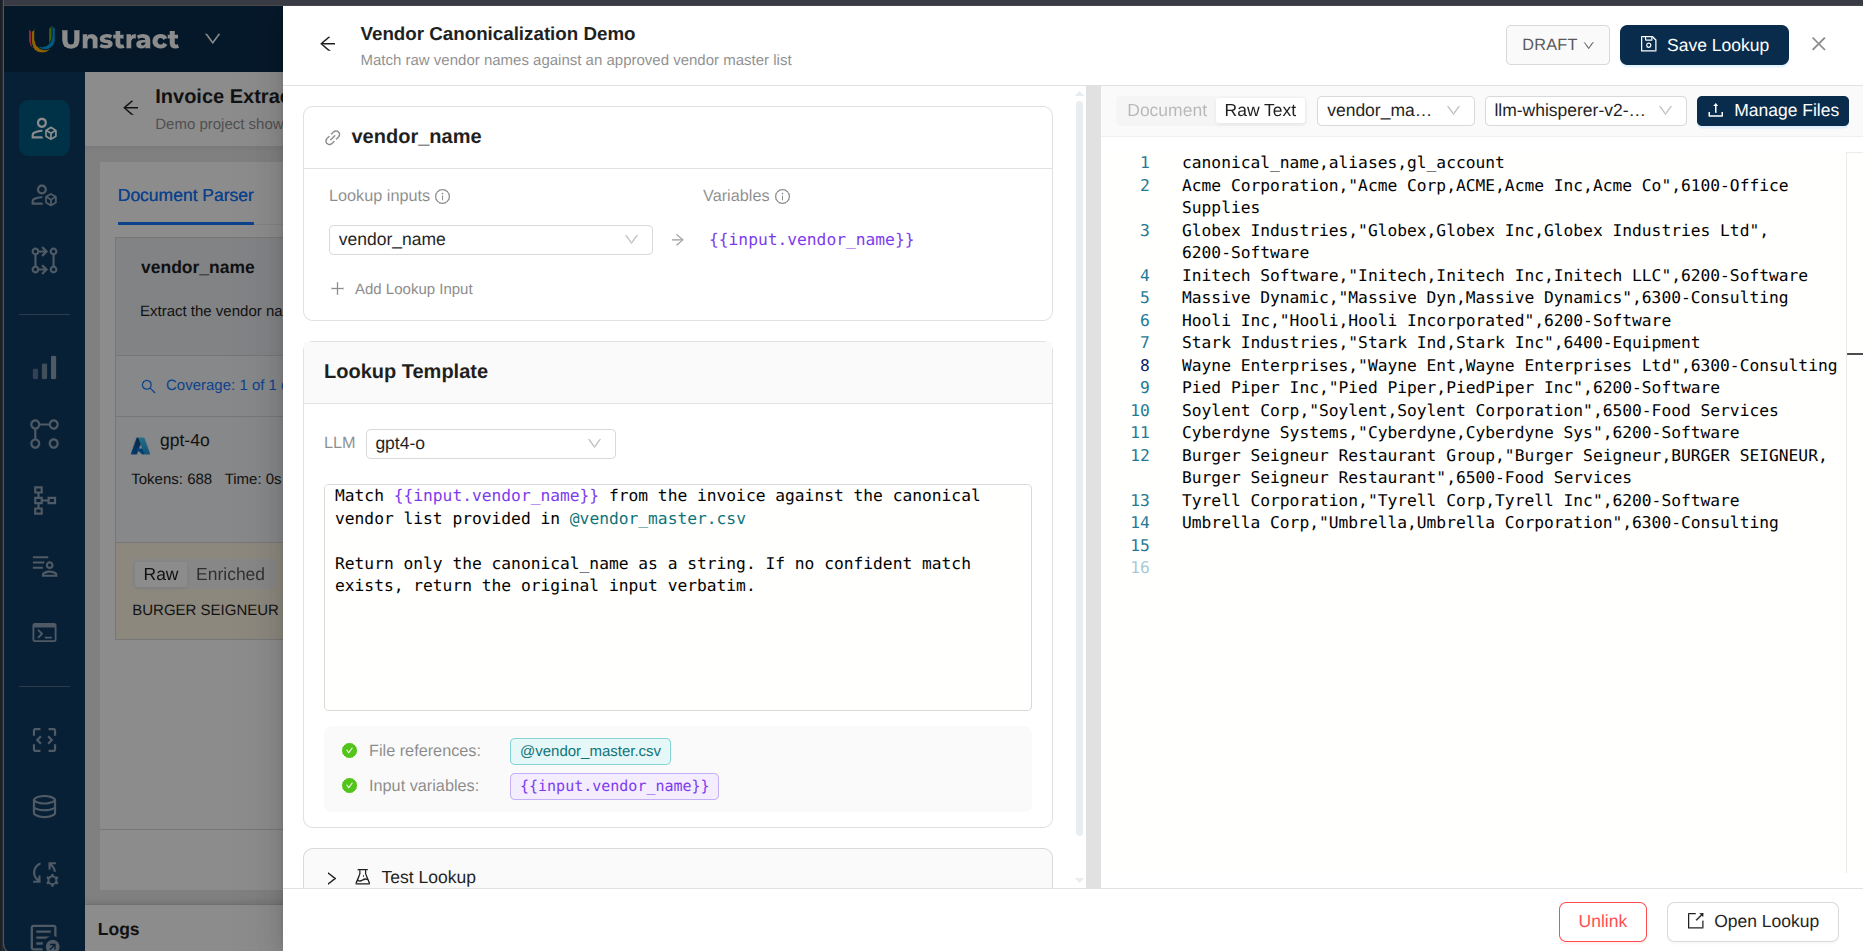
3. Write the template
The template is the prompt the LLM will follow when running the enrichment. Write it in plain English. Two kinds of placeholders are available:
@filename.extinlines the extracted text of an uploaded reference file. The Look-Up resolves these at run time, so you always get the latest extraction.{{input.variable_name}}pulls a value from another prompt in your project. With at least one prompt linked, the editor's autocomplete will surface the available variable names as you type.
A simple template might look like:
Match the vendor name "{{input.vendor_name}}" to the closest entry
in @vendor_master.csv. Return only the canonical vendor name from
the file. If no confident match exists, return the input as-is.
When the same Look-Up is linked from multiple prompts (or multiple projects), each link supplies its own variable mappings. You'll see a small variable-mappings table on the linked-prompts row for the link, where you pick the source prompt for each {{input.X}} placeholder. This is what lets the same Look-Up definition be reused everywhere with different inputs.
The drawer shows a banner if your template references a variable that no linked prompt is mapping yet, which helps you catch typos early.
See the Use Cases & Examples page for ready-to-adapt templates.
4. Test the Look-Up
Before running the full project, test the enrichment in isolation. From the Look-Up detail page or the drawer, fill in sample values for the template's variables in the Test panel and click Run test. The result streams back with the rendered prompt, the LLM's response, and any error details if the call fails.
Test runs are not recorded in the Usage dashboard. See Cost attribution below for how billing applies.
5. Run the Look-Up
Run your project as usual. For each prompt that has a Look-Up linked, the per-prompt lifecycle is:
- Extraction (the prompt's normal LLM call).
- Look-Up enrichment (the second LLM call this feature adds).
- Post-processing webhook, if one is configured.
So a Post-Processing Webhook on the same prompt will receive the enriched value, not the raw one. If you want the webhook to see the raw value, don't link a Look-Up to that prompt.
How the enrichment call is dispatched depends on the project mode:
- Standard runs. Each prompt's extraction is followed by its own Look-Up call. Output cards show Raw and Enriched tabs.
- Single Pass runs. Look-Ups are grouped by LLM adapter and combined into a single enrichment call per group, which keeps token costs down for projects with many Look-Ups.
6. Publish a version
While you're iterating, all changes save to the Look-Up's draft. Once the template behaves the way you want:
- Click Save Version on the detail page.
- Give the version a meaningful name (for example,
v2 added fallback rule). - Confirm. Unstract publishes the draft, creates a fresh empty draft cloned from it, and re-points all linked prompts at the new published version.
You can switch any individual prompt's link back to the draft (to test in-progress changes) or to a previous published version (to roll back) using the Version dropdown on the prompt card or in the Linked Prompts table.
7. Export and deploy
When you click Export Tool or Create API Deployment, Unstract validates every linked Look-Up. If anything is off, an export-gate modal opens listing each issue with one-click fixes.
Export and API/Pipeline deployment are blocked while any of the following is true for the project:
| Gate | Trigger | How to fix |
|---|---|---|
| Draft pin | A linked Look-Up is pinned to a draft version. | Click Save and Update Link in the export modal. This atomically publishes the draft and re-points all linked prompts in the project. |
| Incomplete mapping | A {{input.X}} in the template has no value mapped on this link, or the template / LLM is missing. | Open the Look-Up Drawer from the export modal and pick a source prompt for each placeholder. |
| Multi-variable on non-Single-Pass | A multi-variable Look-Up is linked but Single Pass isn't enabled. | Enable Single Pass on the project, or unlink the Look-Up. |
The export-gate modal lists every offending Look-Up with one-click navigation. You don't need to know which gate triggered. The modal shows the exact list, in priority order, until everything is clean.
Save and Update Link publishes the draft and re-binds all linked prompts in one step, so you don't need to chase down each link manually after a publish.
Mappings on published versions
When a Look-Up assignment is pinned to a published (non-draft) version, its variable-mapping keys are frozen. You can't add or remove variables on that link without first switching the link to the draft. You can still re-aim a mapping (point an existing placeholder at a different source prompt) live, without republishing.
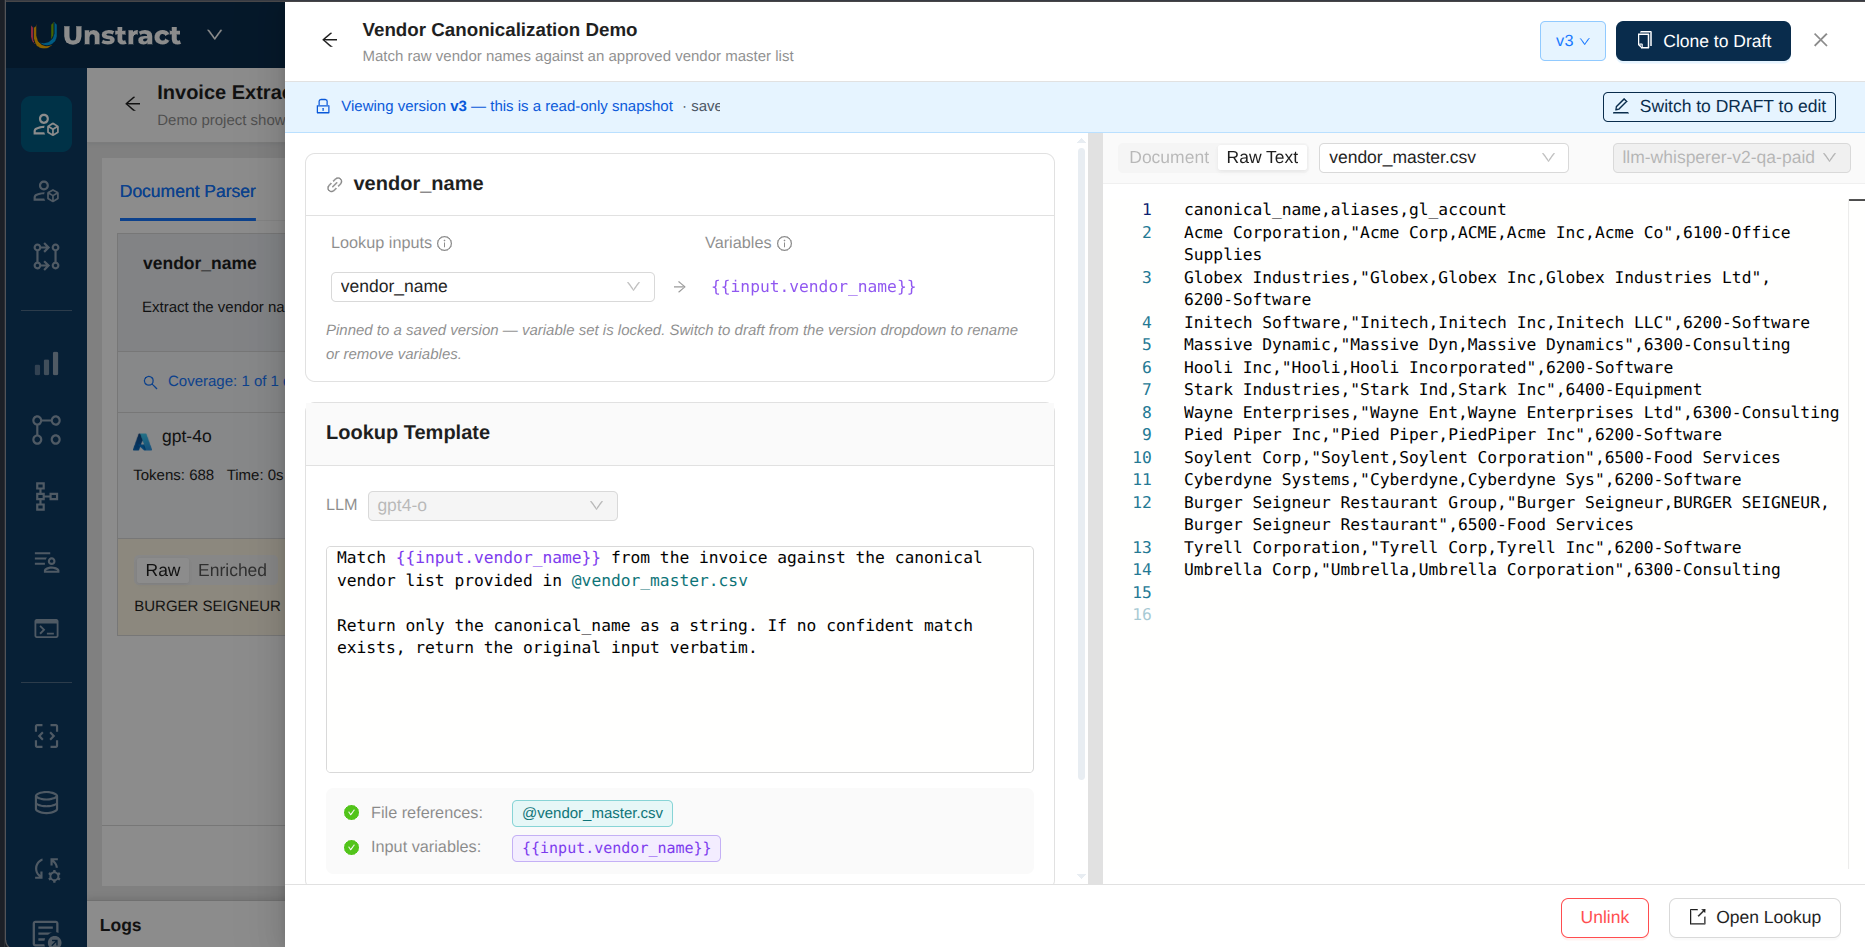
The drawer surfaces this clearly: a read-only banner across the top, the LLM and template editors disabled, an inline note on the variable-mapping panel that the variable set is locked, and a Switch to DRAFT to edit action when you do need to make structural changes.
This is intentional. It keeps the live behavior of deployed projects predictable while still letting you fix wiring on the fly. To change which variables exist in a Look-Up, edit the draft, save a new version, and let the export gate re-pin everything.
What happens when a Look-Up fails at run time
A Look-Up is a second LLM call after extraction, and it can fail (network timeout, model error, malformed response). When that happens:
- The original (un-enriched) extraction value is preserved on the prompt's output, so you don't lose the answer.
- The failure is recorded against the Look-Up's history and surfaced in the Look-Ups → Usage dashboard, along with the error message.
- A WARN-level log line is written to the workflow execution log for that run, naming the Look-Up that failed and the prompt it was attached to.
- Other prompts and other Look-Ups in the same run continue normally; one failing Look-Up doesn't abort the whole extraction.
In short, failures are loud (dashboard + execution log) but non-blocking. The user can still inspect the raw extraction and re-run later once the underlying issue is fixed.
Cost attribution
A Look-Up makes one LLM call per enrichment in standard runs, or one combined call per Single Pass run. Cost has two parts:
- The LLM call itself. This is billed by the LLM provider you've configured (your BYOK adapter), not by Unstract. The same model the rest of Unstract uses for extraction also drives Look-Ups, so cost behaves the same way: provider-side token counts, your provider invoice.
- Reference file pages. Reference files are extracted using your text-extraction adapter on upload (and re-extracted automatically if the adapter's configuration changes). Those extracted pages count toward your text-extraction quota, the same way pages from input documents do.
The Look-Ups → Usage dashboard shows aggregate spend, per-Look-Up history, and the last 10 errors with deep links into the workflow execution logs. Use it for debugging in production.
Test runs from the Test panel are not recorded in the Usage dashboard, so they won't show up in your Look-Up usage history. They do still go through your configured LLM adapter, so the provider-side LLM cost still applies.