Auto Approval in HITL Validation
This feature is available in Unstract Cloud Edition and Unstract On-Premise Edition.
By default, the HITL (Human in the Loop) workflow includes two levels of validation:
- Review - First level validation
- Approval - Second level validation
Based on your requirements, you can configure the system to enable auto-approval and use only single-level validation (Review only).
Only users with Admin privileges can configure auto-approval settings. Regular users will not have access to these settings.
Overview
When auto-approval is enabled, documents reviewed and validated in the Review screen will automatically skip the Approval stage. The results will be sent directly to the queue or database based on your configured workflow settings.
Eligibility Criteria
A document is automatically approved if either of these conditions is met:
- The document's workflow/document class is in the auto-approved list, OR
- The reviewer who finished the review is in the auto-approved user list
The system uses OR logic between these two criteria. This means you can trust specific workflows (like simple forms) or specific reviewers (like senior team members) independently.
How to Enable Auto-Approval
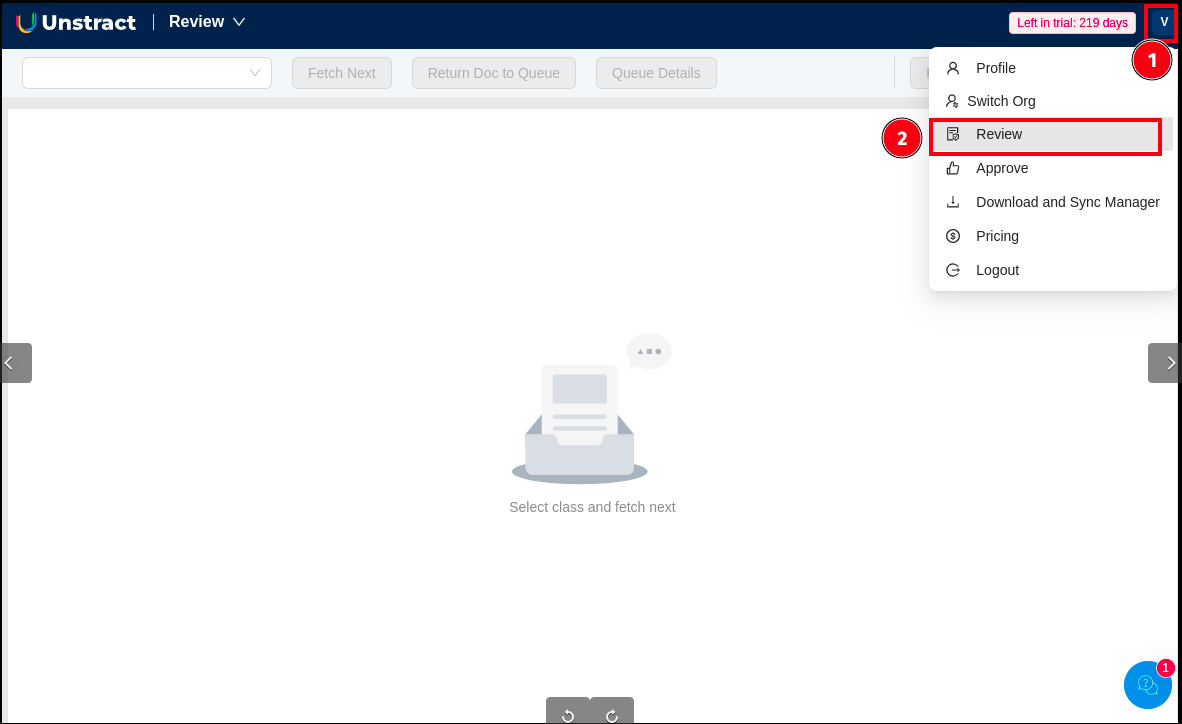
Step 1: Navigate to Review Screen
- Click on your profile menu in the top-right corner
- Select Review from the dropdown menu
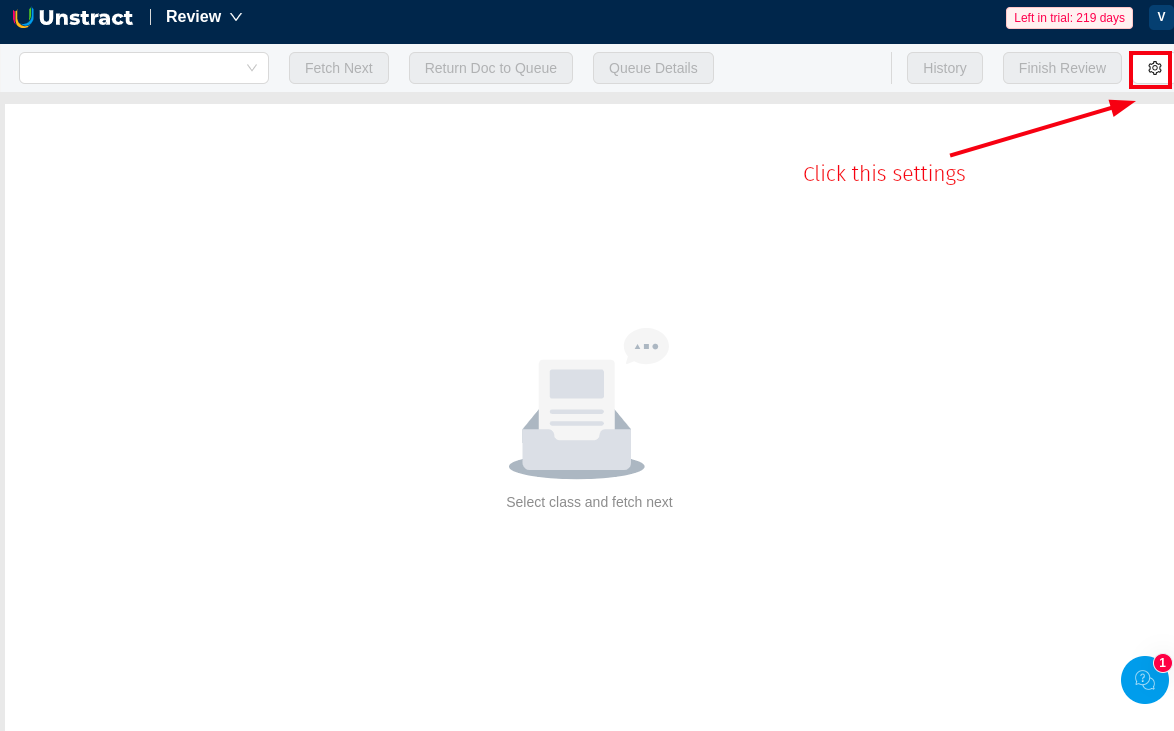
Step 2: Access Settings
- On the Review screen, click the Settings icon (⚙️) located in the top-right corner
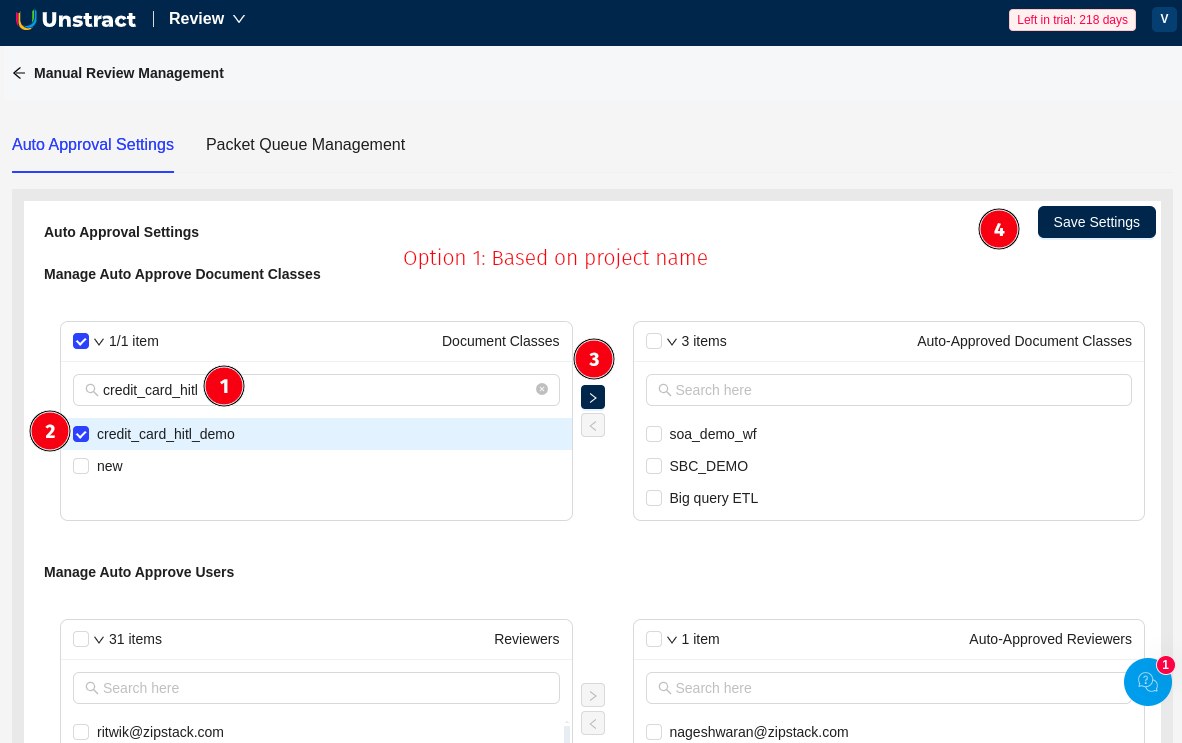
Step 3: Configure Auto Approval Settings
The Manual Review Management page will open with two tabs:
- Auto Approval Settings (default selected)
- Packet Queue Management
Option 1: Based on Document Classes (Project)
Configure auto-approval for specific document classes/projects:
-
In the Manage Auto Approve Document Classes section:
-
Search for the document class in the search box (left panel labeled "Document Classes")
-
Select the document class by checking the checkbox (e.g.,
credit_card_hitl_demo) -
Click the arrow button (>) to move it to the right panel labeled "Auto-Approved Document Classes"
-
The selected document class will now appear in the auto-approved list
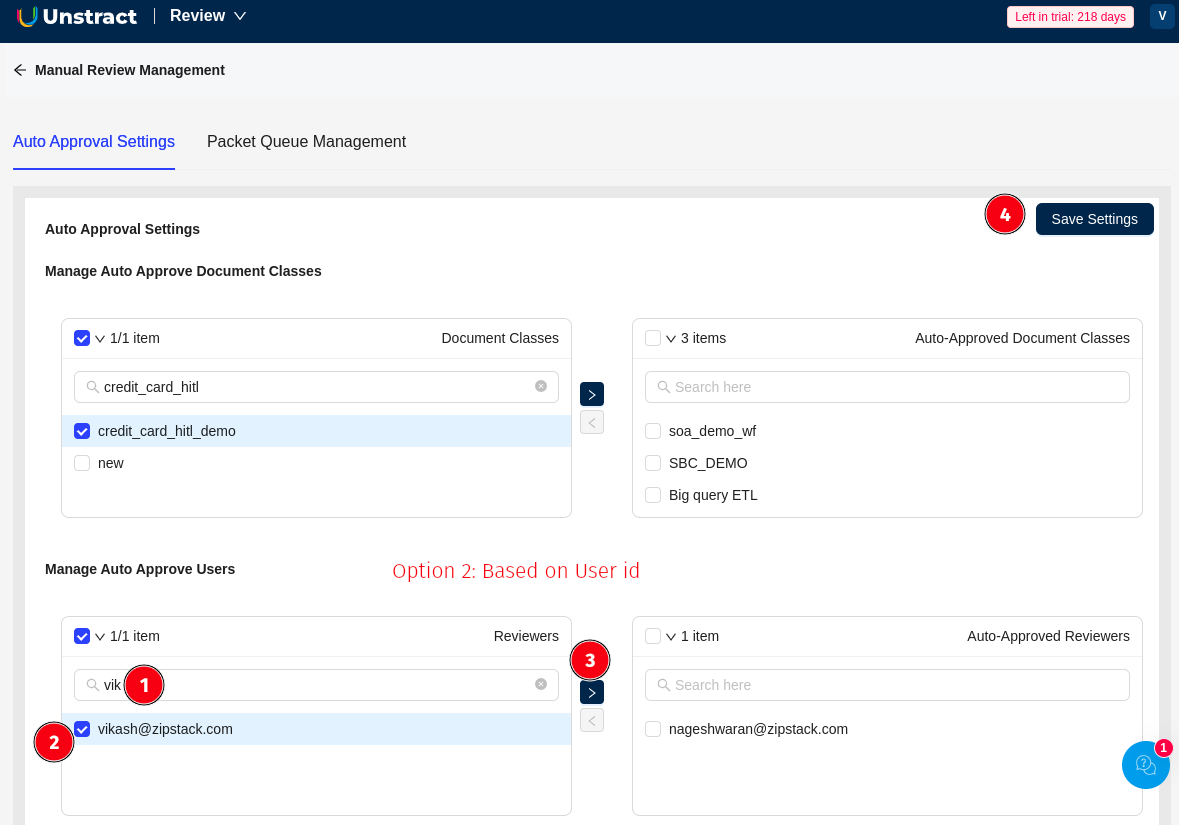
Option 2: Based on Users (Reviewers)
Configure auto-approval for specific reviewers:
-
Scroll down to the Manage Auto Approve Users section:
-
Search for the user in the search box (left panel labeled "Reviewers")
-
Select the user by checking the checkbox (e.g.,
vikash@zipstack.com) -
Click the arrow button (>) to move it to the right panel labeled "Auto-Approved Reviewers"
-
The selected user will now appear in the auto-approved reviewers list
Step 4: Save Settings
Click the Save Settings button in the top-right corner to apply your configuration.
Each organization has one auto approval configuration. Settings apply organization-wide to all HITL workflows.
Workflow Integration
Standard HITL Flow (Without Auto Approval)
Document → Review Queue → Reviewer Edits → Finish Review
    → Finished Review Queue → Supervisor Approves → Destination
Auto-Approved HITL Flow
Document → Review Queue → Reviewer Edits → Finish Review
    → [Auto Approval Check]
        → If Eligible: Destination (Database or Queue)
        → If Not Eligible: Finished Review Queue → Supervisor Approves → Destination
Destination Handling
Auto-approved documents respect your workflow's destination configuration:
Destination Database
If your workflow is configured with "After approval, send result to: Destination DB":
- Auto-approved documents are inserted directly into your configured database table
- The system marks these records with
synced_with_db: True - TTL (Time-to-Live) settings are preserved if configured
Approved Queue
If your workflow is configured with "After approval, send result to: Queue":
- Auto-approved documents are sent to the approved queue:
approved_queue_{org}_{workflow} - TTL metadata is preserved for queue expiration handling
- Retrieve results using the Approved Results API
Important Notes
- Auto-approval can be configured based on document classes OR based on specific users, or both
- When configured by document class: All documents of that class will be auto-approved after review
- When configured by user: All documents reviewed by that specific user will be auto-approved
- Changes take effect immediately after saving settings
Ensure proper authorization and validation processes are in place before enabling auto-approval, as this removes the second level of validation from your workflow.
Use Cases
When to Use Auto-Approval
- Simple, standardized forms with consistent structure
- High-confidence extractions with low error rates
- Experienced reviewers with proven accuracy
- High-volume workflows where supervisor capacity is limited
- Documents from trusted sources
When NOT to Use Auto-Approval
- Complex or variable document types
- New workflows without established accuracy baselines
- New or training reviewers
- Documents with sensitive data requiring dual verification
- Workflows with regulatory compliance requirements for dual review
Configuration Recommendations
- Start Small: Begin by auto-approving a single workflow or one trusted reviewer
- Monitor Results: Track accuracy of auto-approved documents before expanding
- Review Periodically: Audit your auto approval settings quarterly
- Document Decisions: Keep records of why specific workflows or users are auto-approved
Troubleshooting
Documents Not Auto-Approving
Check:
- Verify the workflow ID is in the
auto_approved_document_classeslist - Verify the reviewer's user ID is in the
auto_approved_userslist - Check logs for auto-approval errors
- Ensure the workflow has a valid destination configuration
Settings Not Saving
Check:
- User has admin or supervisor role
- Organization ID is correct
- No duplicate auto approval settings exist for the organization